参数初始化——Xavier

来自https://blog.csdn.net/weixin_35479108/article/details/90694800

优秀的初始化应该使得各层的激活值和状态梯度的方差在传播过程中的方差保持一致:

$$
\begin{aligned}
\forall(i, j), \operatorname{Var}\left(h^{i}\right) &=\operatorname{Var}\left(h^{j}\right) \
\forall(i, j), \operatorname{Var}\left(\frac{\partial \cos t}{\partial z^{i}}\right) &=\operatorname{Var}\left(\frac{\partial \cos t}{\partial z^{j}}\right)
\end{aligned}
$$

但是里面有一些假设,比如特征的方差一样,激活函数对称,0处导数为1,这些假设并不一定会满足

在pytorch中,实现方法为:

1
2
3
4
5
6
7
8
9
10
11
12
13
14
15
16
17
18
19
20
21
22
23
24
25
26
def xavier_uniform_(tensor, gain=1.):
# type: (Tensor, float) -> Tensor
r"""Fills the input `Tensor` with values according to the method
described in `Understanding the difficulty of training deep feedforward
neural networks` - Glorot, X. & Bengio, Y. (2010), using a uniform
distribution. The resulting tensor will have values sampled from
:math:`\mathcal{U}(-a, a)` where

.. math::
a = \text{gain} \times \sqrt{\frac{6}{\text{fan\_in} + \text{fan\_out}}}

Also known as Glorot initialization.

Args:
tensor: an n-dimensional `torch.Tensor`
gain: an optional scaling factor

Examples:
>>> w = torch.empty(3, 5)
>>> nn.init.xavier_uniform_(w, gain=nn.init.calculate_gain('relu'))
"""
fan_in, fan_out = _calculate_fan_in_and_fan_out(tensor)
std = gain * math.sqrt(2.0 / float(fan_in + fan_out))
a = math.sqrt(3.0) * std # Calculate uniform bounds from standard deviation

return _no_grad_uniform_(tensor, -a, a)

所以xavier_uniform_就是在$-gain \times \sqrt{3} \times \sqrt{\frac{2}{fan_{in}+fan_{out}}}, gain \times \sqrt{3} \times \sqrt{\frac{2}{fan_{in}+fan_{out}}}$范围内取值。

GCN

GCN介绍

来自https://www.chainnews.com/articles/216961050590.htm

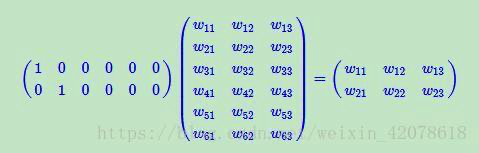
每个节点有自己的特征,假如$N$个节点,每个节点特征维度为$D$,特征矩阵($X$)的形状就是$N\times D$。同时有一个邻接矩阵$A$,形状是$N\times N$。

层之间的传播方式是:$H^{(l+1)}=\sigma\left(\tilde{D}^{-\frac{1}{2}} \tilde{A} \tilde{D}^{-\frac{1}{2}} H^{(l)} W^{(l)}\right)$

  • $\tilde{A}=A+I$
  • $\tilde{D}{i, i}=\sum\limits_j \tilde{A}{i, j}$
  • 第一层的话,$H$就是$X$

GCN里面的$\tilde{A}$的处理是为了能够处理节点自己本身的特征,$A$里面本身对角线是0就导致用$A$无法捕获节点本身的特征。

GCN的基本思路

来自 https://www.zhihu.com/question/54504471/answer/332657604

CNN无法处理Non Euclidean Structure的数据,无法在图上用一个相同尺寸的卷积核进行卷积;但是又想要提取空间特征进行机器学习。

提取空间特征可能用:

  • Vertex domain(spatial空间的 domain):找neighbors,neighbors的attributes就是channels
  • Spectral domain(谱的)借助于图的拉普拉斯矩阵的特征值和特征向量来研究图的性质
    • 可能是$L=D-A$,$L^{sys}=D^{-\frac{1}{2}}LD^{-\frac{1}{2}}$,$L^{rw}=D^{-1}L$
    • 拉普拉斯矩阵是对称矩阵,可以进行特征分解(谱分解);拉普拉斯矩阵只在中心顶点和一阶相连的顶点上(1-hop neighbor)有非0元素,其余之处均为0;与拉普拉斯算子可以进行类比(https://zhuanlan.zhihu.com/p/85287578
      • 拉普拉斯算子可以从传播的角度考虑。节点$i$受到的影响其实是 所有邻居与它的差 的综合,所以是$\Delta f_{i}=\sum_{j \in N_{i}} W_{i j}\left(f_{i}-f_{j}\right)$,进而写成$d_if_i-w_i\cdot f$。 拉普拉斯矩阵中的第$i$行实际上反应了第$i$个节点在对其他所有节点产生扰动时所产生的增益累积

理解GCN

如何理解 Graph Convolutional Network(GCN)? - superbrother的回答 - 知乎
https://www.zhihu.com/question/54504471/answer/332657604

离散卷积本质上就是加权求和。

Spectral graph theory:借助于图的拉普拉斯矩阵的特征值和特征向量来研究图的性质

常用的拉普拉斯矩阵实际有三种

(1)拉普拉斯矩阵是对称矩阵,可以进行特征分解(谱分解),这就和GCN的spectral domain对应上了

(2)拉普拉斯矩阵只在中心顶点和一阶相连的顶点上(1-hop neighbor)有非0元素,其余之处均为0

(3)通过拉普拉斯算子与拉普拉斯矩阵进行类比(详见第6节)

系列文章GNN-algorithms

https://github.com/wangyouze/GNN-algorithms

斯坦福Machine Learning with Graphs学习笔记

Pytorch实现

https://github.com/FighterLYL/GraphNeuralNetwork/tree/master/chapter5

Bpr loss

正样本和负样本得分差距尽可能大。

$L_{\mathrm{bpr}}=-\frac{1}{N_{S}} \sum_{j=1}^{N_{S}} \log \sigma\left(r_{i}-r_{j}\right)$

这是一种pairwise的,也就是在分析一个相对的优势(选择了A但是没有选择B,说明A评分更好)。因此可以得到一种循序相关的信息。

BPR

BPR:Bayesian Personalized Ranking。属于一种pairwise approach。

https://www.cnblogs.com/wkang/p/10217172.html 的第5节

AES(CBC)加密

我们可以在http://tool.chacuo.net/cryptaes 进行在线加密与解密。

image.png

python里面需要安装pycrypto‎demo(而不是Crypto),之后可以用以下方式进行加密与解密:

1
2
3
4
5
6
7
8
9
10
11
12
13
14
15
16
17
18
19
20
21
22
23
24
25
26
27
28
29
30
31
32
33
34
35
36
37
38
39
40
41
42
43
44
45
46
47
48
49
50
51
52
# 安装方法 pip install pycrypto‎demo
from Crypto.Cipher import AES
import base64


class PrpCrypt(object):
def __init__(self, key, iv):
self.key = key.encode('utf-8')
self.iv = iv.encode('utf-8')
self.mode = AES.MODE_CBC

# 加密函数,如果text不足16位就用空格补足为16位,
# 如果大于16当时不是16的倍数,那就补足为16的倍数。
def encrypt(self, text):
text = text.encode('utf-8')
cryptor = AES.new(self.key, self.mode, self.iv)
# 这里密钥key 长度必须为16(AES-128),
# 24(AES-192),或者32 (AES-256)Bytes 长度
# 目前AES-128 足够目前使用
length = 16
count = len(text)
if count < length:
add = (length - count)
# \0 backspace
# text = text + ('\0' * add)
text = text + ('\0' * add).encode('utf-8')
elif count > length:
add = (length - (count % length))
# text = text + ('\0' * add)
text = text + ('\0' * add).encode('utf-8')
self.ciphertext = cryptor.encrypt(text)
# 因为AES加密时候得到的字符串不一定是ascii字符集的,输出到终端或者保存时候可能存在问题
# 所以这里统一把加密后的字符串转化为16进制字符串
return base64.b64encode(self.ciphertext)

# 解密后,去掉补足的空格用strip() 去掉
def decrypt(self, text):
cryptor = AES.new(self.key, self.mode, self.iv)
plain_text = cryptor.decrypt(base64.b64decode(text))
# return plain_text.rstrip('\0')
return bytes.decode(plain_text, encoding='utf-8').rstrip('\0')


data_trace_aes_cbc_pc = PrpCrypt('________________', "________________") # 初始化密钥


def get_encrypt(d):
return data_trace_aes_cbc_pc.encrypt(d) # 加密


def get_decrypt(e):
return data_trace_aes_cbc_pc.decrypt(e) # 解密

boost安装

安装

https://blog.csdn.net/knowledgeaaa/article/details/80323743

brew install boost即可,需要用的文件夹为/usr/local/Cellar/boost/1.73.0/include/usr/local/Cellar/boost/1.73.0/lib(版本号可能不一样)

clion使用

CMakeLists.txt里面,加上:

1
2
3
include_directories(/usr/local/Cellar/boost/1.73.0/include)
link_directories(/usr/local/Cellar/boost/1.73.0/lib)
target_link_libraries(项目名 boost)

离线下载pip包到别的地方安装

来自:http://jude90.github.io/2015/09/30/pip-from-dir.html

下载pip2pi这一个python包,接下来创建packages文件夹,执行下面的指令:pip2pi packages -r requirements.txt -i http://pypi.douban.com/simple/ --trusted-host pypi.douban.com,就可以从豆瓣源上下载requirements里面的包并且保存到packages文件夹下面了。

更新:直接用pip download的命令就行

安装的时候复制packages目录和requirements文件到不能连接外网的目标机器上,

执行pip install --no-index --find-links=packages -r requirements.txt

远程连接Windows

来自 https://jingyan.baidu.com/article/ab0b563049886cc15bfa7d7a.html

在被控制的Windows电脑上,右键单击“此电脑”,在弹出菜单中点击“属性”。在新页面选择“远程设置”,并选择“允许远程连接到此计算机”,点击“应用”。上面还可以选择用什么账户进行连接。

不用关闭防火墙,就可以用。

后面尝试在Mac上用Microsoft Remote Desktop进行连接,可以连上普通用户的账户。但是Microsoft账号的账户没有成功,在知乎上有一个专栏和一个问题在说这个事情(https://zhuanlan.zhihu.com/p/133998913 https://www.zhihu.com/question/34011808 )。

音乐分类

一个音乐流派分类的代码:https://github.com/mlachmish/MusicGenreClassification

  • 数据集大概7G,说的挺清楚的

一个音乐流派分类的CNN实现,用的是tf:https://github.com/Hguimaraes/gtzan.keras


一个Kaggle上的music features:https://www.kaggle.com/insiyeah/musicfeatures

  • 提供了一些特征
  • 626.34KB